An influencer box has one job that a shelf product never has to do: it has to perform on camera. The reveal is the advertisement, and the box is a prop in a video that thousands of people may watch. That changes what “good packaging” means, and it is why boxes that would be perfectly fine in a warehouse fall flat in a creator’s hands. Most of the damage comes from a short list of avoidable mistakes. Here are the ones worth designing against before you commit to a run.
Sizing the box for the product, not the reveal
The most common error is a box that is too big. A roomy box feels safe, but on camera the extra space reads as emptiness, the product slides around, and the reveal loses its sense of occasion. Oversizing also quietly inflates your shipping bill. Carriers charge on dimensional weight, calculated as length times width times height divided by 139 for common domestic UPS and FedEx services, and they bill the greater of actual and dimensional weight. That means air inside an oversized box is freight you pay for.
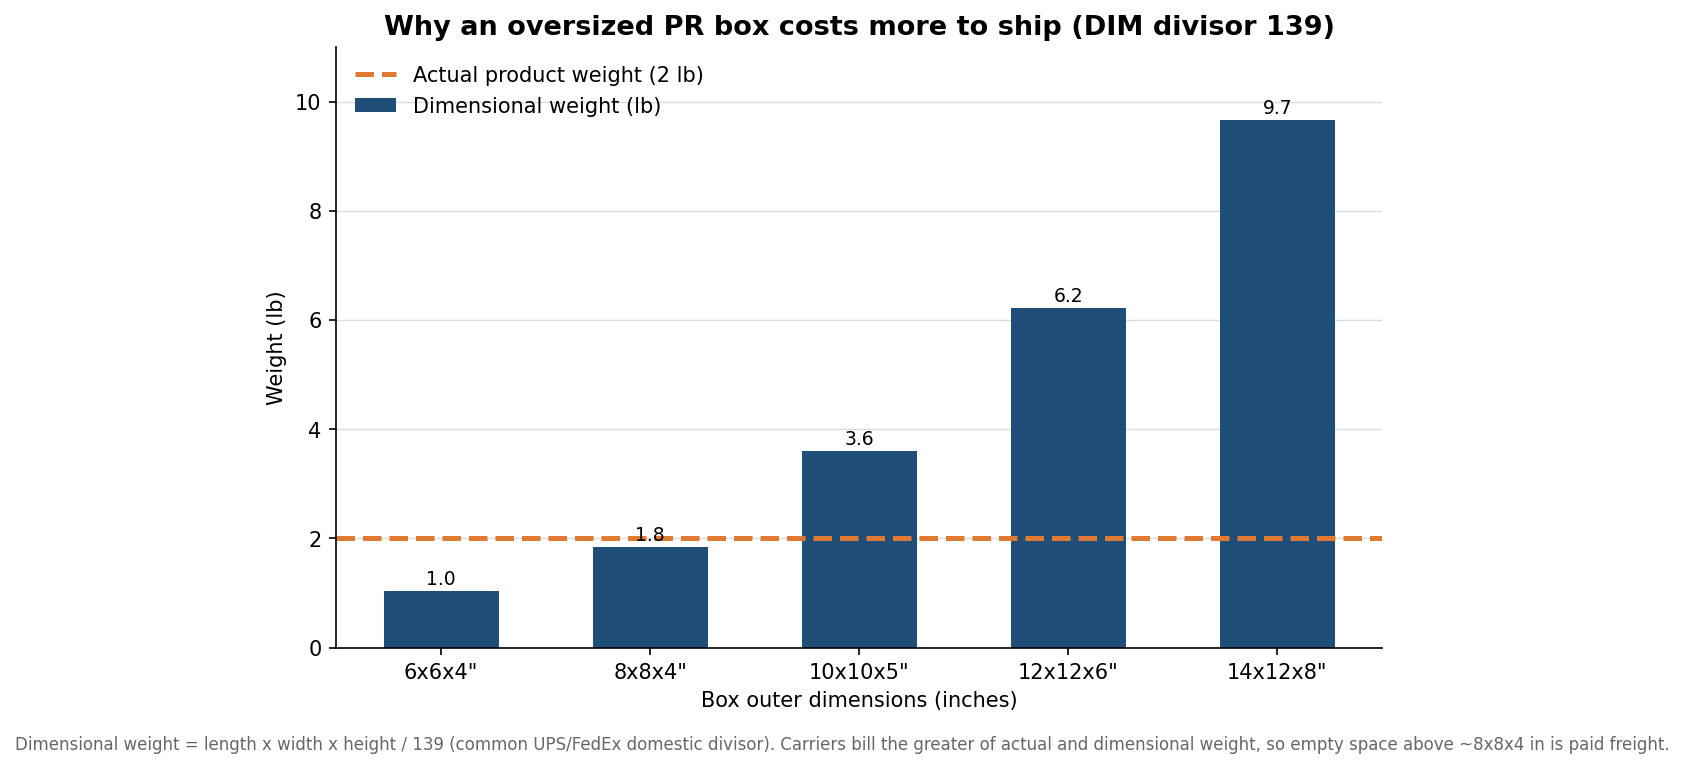
As the chart shows, a light product in a 12 by 12 by 6 inch box can be billed at more than three times its real weight. Size the box to the product with just enough room for a protective insert and a reveal layer, and you fix the on-camera problem and the shipping problem at the same time. When in doubt, prototype with the actual product inside before ordering, not a stand-in.
Treating void fill as an afterthought
Void fill is what the camera sees first when the lid comes off, so it is a design decision, not a packing-line default. Loose fill and plastic packing peanuts read as cheap and photograph badly, and they scatter the moment a creator tips the box. Custom inserts that cradle each item, molded pulp trays, and neatly folded tissue or crinkle paper all do the opposite: they hold the product still, protect it in transit, and frame the reveal. If the products are fragile, the insert is also your main protection, so it has to be engineered for the trip, not just the photo.
There is a sustainability angle here too. Plastic void fill is increasingly a bad look on camera for beauty and lifestyle brands, and creators sometimes call it out. Paper-based crinkle fill, molded pulp, and recyclable inserts keep the unboxing on-brand for an audience that notices these things.
Flattening the reveal into a single layer
A memorable unboxing has a sequence: the outer mailer, then the branded box, then a layer that has to be lifted or moved, then the product, then a personal touch. Dumping everything into one open tray removes the pacing that makes a reveal watchable. Layered reveals, a magnetic-closure rigid box that opens like a book, or a drawer-style box that slides out all buy you a beat of anticipation. You do not need every trick; you need one or two deliberate moments rather than a flat, everything-at-once presentation. A simple, reliable structure is a rigid box with a lift-off lid, a printed tissue layer, then the hero product seated in an insert with the smaller items tucked beneath. That gives a creator a natural three-beat reveal without any complicated mechanics that might jam or arrive damaged.
Personalization is the layer brands skip most often and regret most. A pre-printed card with a handwritten signature, the creator’s name on an insert, or variable-data printing that swaps the name and message per recipient turns a generic mailer into something a creator is far more likely to film and mention. It is inexpensive relative to the box itself and it is the single clearest signal that the send was not a bulk blast.
Budgeting the box but not the program
Many brands price the box and assume they have priced the campaign. They have not. Once you add print and finishing, inserts and void fill, personalization, kitting labor, and shipping, the box itself is often less than half of the true per-unit cost. Underestimating those components is why programs run over budget or get quietly downgraded at the last minute.
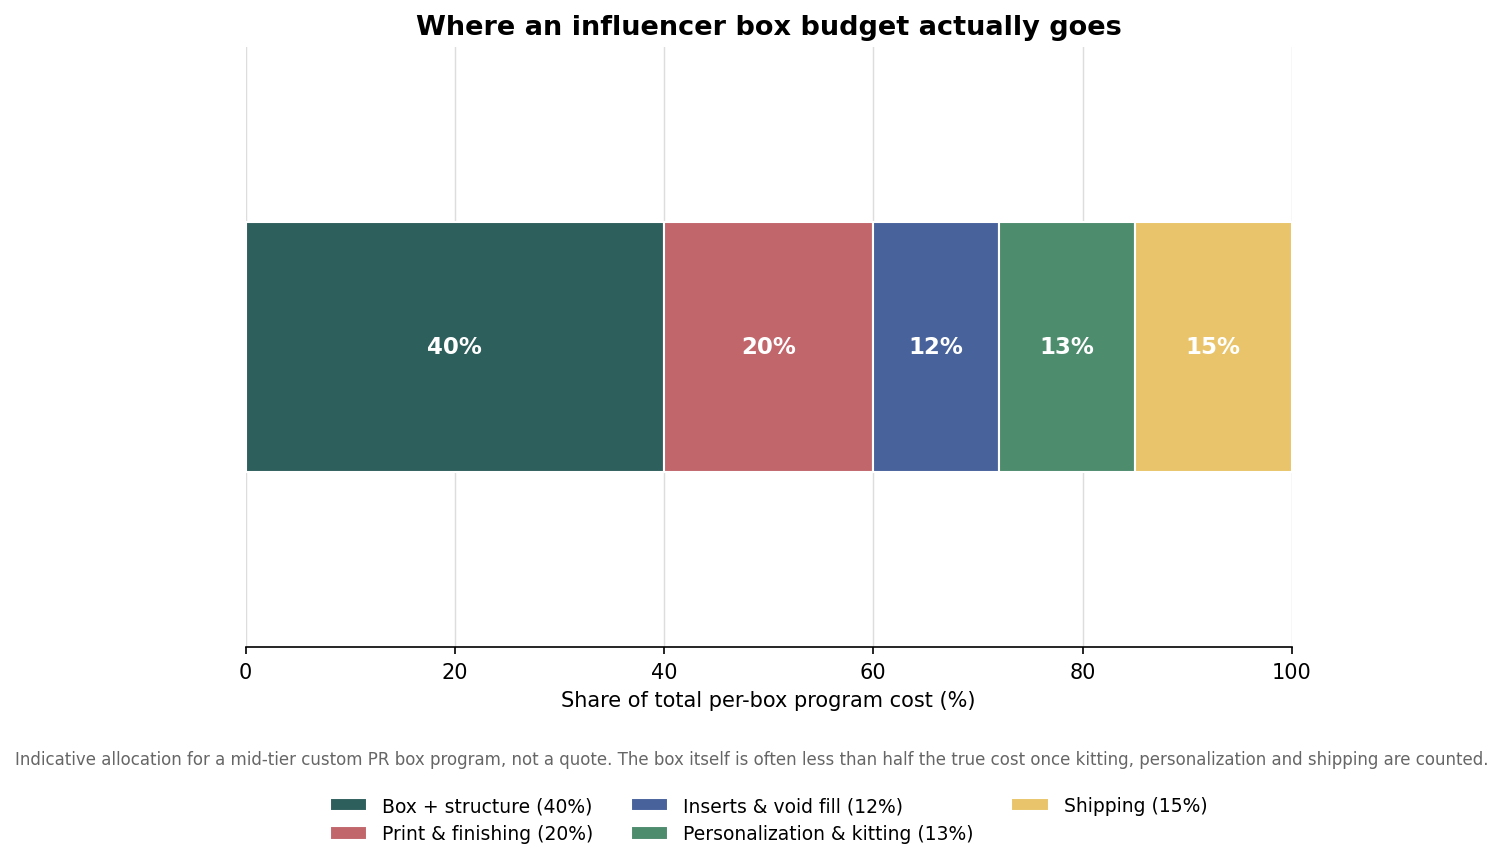
Treat the numbers above as an indicative shape rather than a quote, but use them as a checklist. If your budget only accounts for the printed box, you are missing most of the spend, and the pieces you forget, kitting and shipping, are the ones that scale hardest as your list grows. Build the full per-box cost first, then decide how premium the box can be.
Getting the finish and the timeline wrong
Finish matters more on camera than on a shelf because of lighting. High-gloss lamination shows fingerprints and glare under a creator’s ring light, while soft-touch lamination photographs clean and feels premium in hand. Spot UV and foil can add a highlight that catches the light in a good way, but only in moderation; a box that is all shine reflects the room and hides the branding. Test your artwork under bright light, not just on a monitor, because color and contrast shift under studio lighting.
Finally, respect the calendar. Custom boxes, inserts, and personalization each have their own sourcing lead time, and the slowest component sets your schedule. Brands routinely underestimate this and end up compromising the design to hit a launch date. Lock artwork and components early, order a physical proof, and confirm that lids, inserts, and the product actually fit together before the full run. Avoid these mistakes and the box does what it is there to do: it makes the unboxing worth filming.
Leave a Reply